Discord
Discord is a communications platform that can do many things. It is mostly used for voice chat. In addition, it can do text chat, and media and file sharing. Discord is very popular in the gaming community.
This article will discuss how to setup and configure Discord, and use it in EverQuest.
How to use Discord[edit | edit source]
Discord works in Windows, as well as Android, iOS, iPadOS, Linux, and web browsers. So you can choose how you want to use it. This article will discuss Windows and web browsers. If you want to use it on your phone or tablet (or Linux computer), you will need to figure out what is different on your own.
Windows or Web Browser?[edit | edit source]
Using Discord in Windows requires that you download and install the Discord client. The advantage to doing so is that you can also then use the Discord game overlay, which shows you who is talking on your EverQuest screen. The disadvantages are having to install this into Windows, and making sure to tell it not to always run at Windows startup (of course, if you do want it running at Windows startup, you can just let it do so).
Using Discord in your internet browser (such as Google Chrome, Microsoft Edge, or Mozilla Firefox) means that you do not need to install anything and it opens and closes in a browser tab. The disadvantage is that you cannot use the game overlay.
How to start using Discord[edit | edit source]
The first step is to decide if you want to use the Windows app or the browser version. Go to https://discord.com/ and click either the "Download for Windows" or "Open Discord in your browser" button.
Download for Windows[edit | edit source]
Click the "Download for Windows" button. Your browser will then download the DiscordSetup file (you may have to confirm the download depending on your browser settings). Once you have downloaded the file, you need to run it.
Run the file and install Discord. Create an account.
Open Discord in your browser[edit | edit source]
Click the "Open Discord in your browser" button. Enter a username (don't worry, you can change it later). Then enter your email address and password. Follow along and provide whatever information they want. It should eventually open up Discord in your browser.
User Settings[edit | edit source]
Once you have whichever Discord version you picked running, at the Discord Home, at the bottom left of the screen is your username, a microphone icon, a headset icon, and a gear icon. Click the gear icon to access User Settings.
Username[edit | edit source]
You need to pick a Discord username. Don't worry if you already picked one, you can change it at any time. Under My Account, you can edit your Username.
In addition, you can have a different name show for each server in Discord. On the main Discord screen, find the server icon on the left side of the screen. Right click on it and choose Change Nickname.
Voice & Video[edit | edit source]
The User Settings > App Settings section has Voice & Video where you can set up your microphone and speakers/headset. You can also pick Voice Activity (voice activated) or Push to Talk (PTT). If you pick Push to Talk (PTT), you may wish to go to the App Settings > Notifications and uncheck PTT Activate and PTT Deactivate unless you want to hear a sound every time you press and release the Push to Talk button.
Windows Settings (Windows version only)[edit | edit source]
Unless you want Discord starting when you start Windows, go to User Settings > Windows Settings and disable Open Discord. In addition, when you attempt to close Discord by hitting the "X" in the upper right of Discord, it actually doesn't close Discord but instead minimizes it and keeps it running as an icon in your Windows system tray (near the clock in the taskbar at the bottom of your screen). In order to actually close Discord by hitting the "X", you need to disable the Minimize to Tray option here.
Overlay (Windows version only)[edit | edit source]
The Discord Overlay can let you see who is talking right in EverQuest. The name of whoever is speaking shows up on your EQ screen. In Discord, go to User Settings. In User Settings, find the Overlay settings. Enable in-game overlay.
By default, the Overlay will show everyone in the Voice Channel you are in. For most of us, this is too much. So, in the Overlay settings, change Display Names and Display Users to Only While Speaking.
In order to get the Overlay to work in EverQuest, you need to start EverQuest. Once EQ is running, go to Discord User Settings > Game Activity. There you should see an entry for EverQuest. Enable the EverQuest overlay.
Overlay Notifications[edit | edit source]
In the Discord User Settings > Overlay, at the bottom is Show Text Chat Notifications. This shows in EverQuest when people use the Discord text chat. You can turn this off if you don't want to see that chat.
Moving Overlay[edit | edit source]

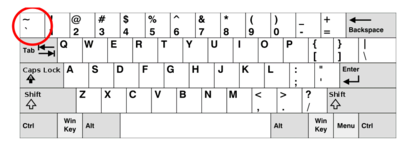
If you wish to move the overlay to a different area of your EverQuest screen, while in EverQuest, hold down the Shift and ` (grave accent) keys. The ` (grave accent) key is the key left of the 1 (one) on your keyboard. This will pop up Discord inside EverQuest. Then use your mouse to drag the part of the overlay with the voice chat channel to where you wish it to be. Then hit the Shift and ` keys again to return EverQuest to normal.