User Interface
This page is for information on the EverQuest User Interface.
 | |
|
Default and Custom UI information
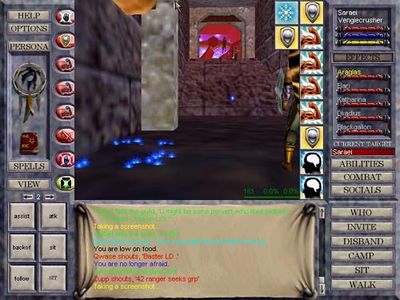
Default UI
Custom UIs
Fanra's
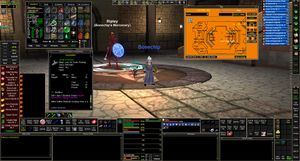
Download it here: Fanra's UI at EQ Interface
Alternate download site: Microsoft Live OneDrive - Single pieces as well as zipped "Fanrasui##" and "geddinesmini##". Download the "Fanrasui##" (the # represent the number of the current version, it is suggested you use the highest number available) if you just want one zip file with the UI you can unzip and use.
SparxxUI
Sparxx is a Featured Artist over at EQInterface.com, and SparxxUI is rated #1 by popular vote.
Download it here: SparxxUI at EQ Interface
Lists of all known console commands
Lists of commands shown in game
- Normal commands
- Emote commands
- Guild commands
- Voice commands
- Chat commands
- Alternate Advancement - /alternateadv (ON, OFF, or LIST): Allows you to turn AA XP on, off, and also lists all AAs available to you. You can also set the percentage of XP going toward AAs, /alternateadv on #
Welcome screen toggle
Not yet tested is this possible way to prevent the Welcome screen from appearing each time you log in:
Inside your Sony folder in EverQuest there is a file called eqclient.ini....open that file with notepad and about half way down inside that file you will see this "DetectWelcomeFailure=1" except yours will say =0 change the zero to a 1 and and save the file. When you restart EverQuest it will tell you in your window that there was a problem with the welcome screen and that it has been disabled, from now on it will not load when you load the game.
Blocking buffs
It is possible to block spells that don't have buff icons via your INI file. Make sure you are logged out completely before doing this.
Open up your EQ folder and find a file named Yourname_server.ini you will come to a few lines that say something like
[BlockedSpells]
BlockedSpellID0=-1
BlockedSpellID1=-1
BlockedSpellID2=-1
BlockedSpellID3=-1
BlockedSpellID4=-1
BlockedSpellID5=-1
BlockedSpellID6=-1
BlockedSpellID7=-1
BlockedSpellID8=-1
BlockedSpellID9=-1
BlockedSpellID10=-1
Next you go to lucy.allakhazam.com, search for a spell... say Voice of Clairvoyance in the URL box you will see something like http://lucy.allakhazam.com/spell.html?id=5522&source=Live
The spell id is 5522, you just place the 5522 part in the first slot where it says "-1" ex. BlockedSpellID0=5522
Voice of Clairvoyance will be put into your blocked buff list If you wish to take it off, just find the ID of the spell and put it back to -1 and the spell will be removed.
If none of the BlockedSpellID have -1 in the place of an ID you can just added a line with BlockedSpellID<nextnumberinline>=xxxx
Common spell ID's
2538 = Mass rod
2198 = Mass bread
2199 = Mass water
Brells: 3028, 5297, 2590, 3432, 3578
SD, SA etc: 2178, 2630, 3456, 5530
C1-6: 697, 174, 1693, 1695, 2570, 3350, 3360, 5513, 5522
Number of buff slots
The number of spells (effects, buffs) that you may have on your character at one time.
- You start with 15.
- You may buy up to 7 more with AAs (up to Seeds of Destruction).
- You can gain one by doing the Dragons of Norrath progression
- You gain one for reaching level 72.
- You gain one for reaching level 75.
- The maximum total possible up to the Seeds of Destruction expansion is 25.
- You can buy 5 more with AAs if you have the Underfoot expansion, bringing the total possible to 30 at that point.
- You can buy 5 more with AAs if you have the Veil of Alaris expansion. SOE mentioned prior to the release of VoA that you would also be able to get more buff slots from content in-game, however, we don't know if this ever was added to the game.
- Rain of Fear introduced 3 more slots with AAs (Mystical Attuning).
- Call of the Forsaken adds the ability to purchase 2 more with AAs (Mystical Attuning). You must be level 100+ to purchase them.
- Maximum possible with level 100 and Call of the Forsaken appears to be 40.
The number of short duration buffs (song window) you may have on is 20 (to be increased in April 2014 to 30). If you go over 20 it overflows into your normal buff window until that fills up.
Bandolier switching for pulling
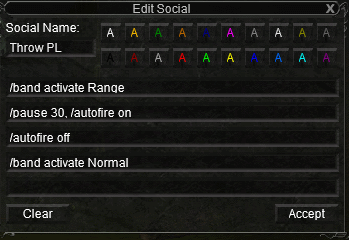
It is possible to set up your Bandolier so that it switches out your normal range item for your throwing item, throws it about three times and then switches back to your normal item, and do so by only having to hit one key.
This may also work for bows and arrows, however, we need a report to confirm.
To do so set up a social as follows:
The /band activate Range command tells the Bandolier to switch to the "Range" set of weapons. Put in the name of your throwing setup in the place of "Range".
The /pause 30 time might need adjusting depending upon your throwing item's speed. With a monk using a 15 delay weapon, /pause 15 was a good number to throw it three times. Your mileage may vary.
The /band activate Normal command switches back to the "Normal" set. Again, put in the name of your setup in place of "Normal".
Adding locs on a map
While you're not in the zone, open up the map file in a text editor (hopefully not Notepad, because it's kind of nasty). Add in the location you're interested in. Bottom, top, doesn't matter.
The format of the map files is simple enough anyone can manage it:
- P 157, -59, -156, 0, 0, 0, 3, Crescent_Reach
P = marker telling EQ this is a point of interest which should be labeled. Most of the rows say L which describes a line on the map.
157 = second number of the /loc with the sign changed.
-59 = first number of the /loc with the sign changed
-156 = third number of the /loc
0, 0, 0 = the color of the label. Black in this case, which should be good enough.
3 = Means a Large size label.
Crescent_Reach = The text of the label. Spaces aren't allowed, but underlines show up as spaces on the map.
Creating linkable (colored) socials
To make parts of your socials look like item links, do the following:
You must not be running EQ.
In your EverQuest folder open up the file "<charactername>_<server>.ini" (example "Fanra_bertox.ini"). Note that by default Windows hides file extensions, so if the ".ini" part of the file name might not be shown. Windows should show it as a "Configuration" or "INI" file.
Find an already created social.
For example: Page2Button2Line1=%t is incoming (clever saying goes here).
Replace the text you wish with the line below (replace the %t with something else if you don't want to use the name of your target)
�00272D0000000000000000000000000000000003BEA06115A9 %t�
Save the edited .ini file. Start EQ and it should work.
Note that the above link will show an emerald if someone clicks on it. The numbers can be changed to any item in the game.
�00B43A00000000000000000000000000000000038D197C51E8 AnyTextHere� - Is a Fairy Wing
�0057FA000000000000000000000000000000000000C67DD6D6 AnyTextHere� - Is Iksar Blood
�002BA7000000000000000000000000000000000000F21E685B AnyTextHere� - Is Can o' Whoop
To get the numbers for other items, in game turn your log on, bring up the Item Display window for the item you want a code for. Type ;tell (click item icon) spam - then go to your log file and you will see the item code followed by part of the item name, like this one for the Weighted Hammer of Conviction:
[Thu Aug 16 20:48:55 2007] Could not find player 010DF700000000000000000000000000000000056F6A30870D Weighted
IMPORTANT NOTE: Because of the way MediaWiki displays text and that I can't figure out the exact Unicode symbol, instead of using the � symbol, you need to download the sample file Colored Socials.ini and copy and paste the symbol used in it. You can change the numbers to match the item you want to use and the text to match the text you wish.
Changing the color of group member's "x" on map
Go to your file UI_Playername_Servername.ini.
Look for [MapViewWnd]
ShowGroup=true
GroupColor.red=0
GroupColor.green=0
GroupColor.blue=0
Change the GroupColor to any color you want. You have to pick numbers between 0 and 255.
Alternate method includes your own arrow
The March 16, 2012 patch changed the map window and added the ability to change the color of the player on the map window from black. The ini for it (MyColor) is found in the [MapViewWnd] section of your character's ini file and defaults to blue.
Additionally, the ability to change the group color, the local player color, and the find path color is now available through the Map Toolbar window. New buttons in this window to allow easy modification of each of the color options.
Using Disciplines in socials
The command for the Discipline Throat Jab would be:
/disc Throat Jab
or
/disc Throat Jab Rk. II
Put in the name of other Disciplines in the place of Throat Jab to use them.
Understanding the Stats tab
In the Inventory window, there is a Stats tab. It lists your stats in the form of:
xxx/yyy +zzz
XXX being the current amount you actually have, based upon buffs, gear, and starting stat distribution.
YYY being your current CAP, based primarily upon level and AA's, though some buffs will increase some stat caps.
+ZZZ being the amount of Heroics you have for that stat.
If XXX is greater than YYY then you have a buffer for upgrading equipment, or putting on a powersource that has a negative in that stat. You do not gain any other benefit for having XXX greater than YYY. As long as XXX is greater than or equal to YYY your displayed stat on the main inventory page will be the sum of YYY +ZZZ.
Cross server and cross game chat
Players of EverQuest, EverQuest II, Planetside, and Vanguard can chat with one another by using specific chat syntax. You can also send mail to fellow players in any SOE game. Listed below are instructions.
(Note: you may use either the semi-colon ( or the left bracket ([) symbol as both work interchangeably, it's just up to your personal preference. However the slash (/) symbol will only work in EQ on the same server for tells or joining channels.)
These instructions are for players in EverQuest only, please see instructions for other game titles as they will vary slightly.
Sending Tells: (you may use [tell, ;tell, [t, or ;t)
- To send a tell to a friend on another EQ server, type: [t servername.charname
- To send a tell to a friend playing EQII, type: [t eq2.servername.charname
- To send a tell to a friend playing Planetside, type: [t ps.servername.charname
- To send a tell to a friend playing Vanguard, type: [t vgd.servername.charname
Sending Mail: (uses the same syntax across games)
- To send mail to someone on another EQ server, enter their name as: servername.charname
- To send mail to a friend in EQII, enter their name as: eq2.servername.charname
- To send mail to a friend in Planetside, enter their name as: ps.servername.charname
- To send mail to a friend in Vanguard, enter their name as: vgd.servername.charname
The EQ server names for these commands are as follows:
- Antonius Bayle (Kane) - antonius
- Bertoxxulous (Saryrn) - bertox
- Bristlebane (The Tribunal) - bristle
- Cazic Thule (Brell Serilis) - cazic
- Drinal (Tarew Marr) - drinal
- Erollisi Marr (The Nameless) - erollisi
- Fennin Ro (Torvonnilous) - fenninro
- Fippy Darkpaw - fippy
- Firiona Vie (Roleplay Preferred) - firiona
- Luclin (Stromm) - luclin
- Povar (Quellious) - povar
- The Rathe (Prexus) - rathe
- Trakanon - trakanon
- Tunare (The Seventh Hammer) - tunare
- Vulak`Aerr - vulak
- Xegony (Druzzil Ro) - xegony
- Zek (PvP) - zek
The EQII server names for these commands are as follows:
- Antonia Bayle - antonia_bayle
- Butcherblock - butcherblock
- Crushbone - crushbone
- Everfrost - everfrost
- Freeport - freeport
- Guk - guk
- Nagafen - nagafen
- Oasis - oasis
- Permafrost - permafrost
- Unrest - unrest
- Valor (German) - valor
- Splitpaw (English / EU) - splitpaw
- Sebilis (Japanese) - sebilis
- Storms (French) - storms
Autojoining chat channels
If you are not familiar with the /autojoin command here is a quick rundown on how it works:
- /autojoin channel1, channel2, channel3, channel4:password, channel5, ...., channel10
- If you want to stop auto joining a certain channel just redo the command leaving that channel out; if you wish to stop autojoining all of the channels you have chosen then simply do the command and leave it blank after it: /autojoin
- If a channel is full and you get sent to an overflow channel, then autojoin will stick the last channel into that spot and go on and try the overflow last (maybe it tries the original again then goes to overflow) but your /list will look like this if you get an overflow on say channel 3:
- Channels: 1=channel1(23), 2=channel2(35), 3=channel10(52), 4=channel4(150), 5=channel5(100), 6=channel6(75), 7=channel7(15), 8=channel8(54), 9=channel9(15), 10=channel31(5)
- Just typing /list will list the channels you are currently in along with what channel # they are
- Typing /list channel1 or /list 1 will list all of the people in that channel.
Stick Figures
To make most players and NPCs appear as red stick figures, add the following to your eqclient.ini file (under [Defaults]):
StickFigures=1
That should help your frame rate among large numbers of figures. It doesn't seem to change the appearance of Drakkin, however, for some reason.
Auto shutting off tribute when you log
Create the following socials:
 |
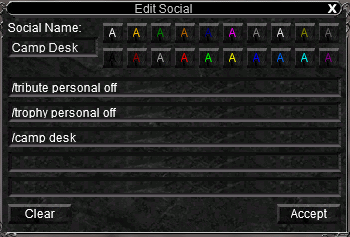 |
Use these hotkeys to log out of EQ and you will never leave your tribute running offline again.
Thanks to Malacath for this information.
